Linksys PAP2 Configuration | Zoiper Configuration | Nokia N Series sip | Gigaset A580IP manual | Netcomm NB9_NB9W | Netcom v300 | Billion 7404 | Cisco ATA 186/188 | Netgear DG834DV | 3CX VOIP phone
Initial X-Lite 3.0 Configuration (for Windows)
First time configuration of X-Lite 3.0
Now that you've successfully installed the X-Lite Softphone on your Windows XP/2000 PC you're ready to configure your VoIP account.
To open X-Lite select the Start button, then select All Programs/Programs, from this menu select X-Lite and choose X-Lite to open the software. [view screen shot]
The X-Lite Softphone should now appear on your screen, as this is your first time loading the software you maybe prompted as to whether you wish to provide quality information, selecting Yes or No to this prompt does not affect the running of the soft-phone in anyway. [view screen shot]
X-Lite will now proceed to automatically detect your installed audio devices for use with the Soft-Phone, if you wish to manually configure these devices you can do so at this point. You will also be prompted with a SIP Accounts window, this is where we will configure your ClicknCallnow VoIP account to work with the X-Lite Softphone. [view screen shot]
On the right-hand side of the Sip Accounts window click the Add button [view screen shot]
You will now be presented with a configuration window to setup your ClicknCallnow VoIP account.
In the Account tab under User Details fill in the following information which were provided when you activated your ClicknCallnow VoIP account:
Display Name - Enter your VoIP number .
User name - Enter your VoIP number (This is the username you receive from us).
Password - Enter your VoIP password (this is the password you receive from us).
Authorization user name - Enter your VoIP number (This is the username you receive from us).
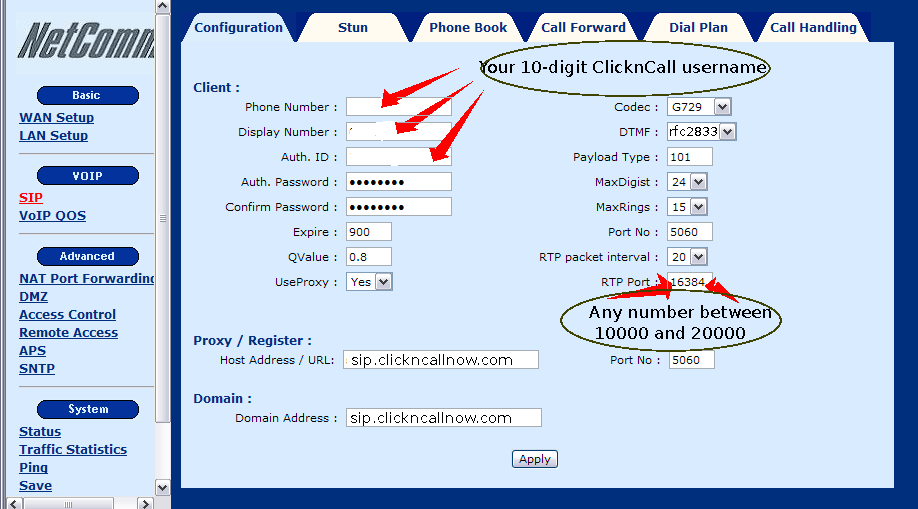
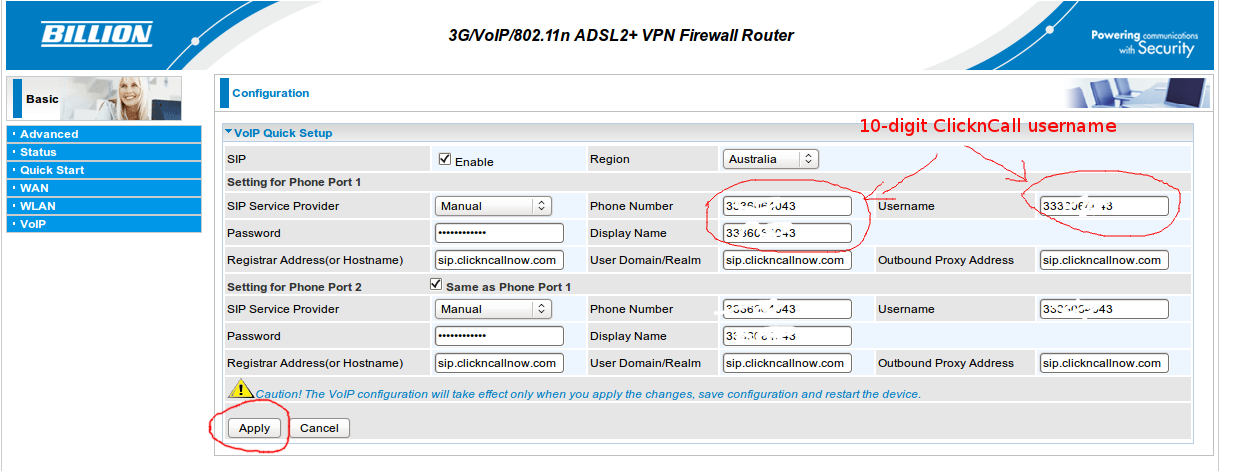
Domain - In this box enter the ClicknCallnow VoIP server which is: sip.clickncallnow.com
Under Domain Proxy fill in the following information:
Register with domain and receive incoming calls - Leave this checkbox ticked.
Send outbound via - Leave target domain selected.
Dialing plan - Leave this information as is.
Once you've entered all of the above information, it should look something like this: [X-lite screen shot 1] and [X-lite screen shot 2]
Please also tick the "Use local IP" option under the "Topology" tab.
Click the OK button located at the bottom of the window to save these changes.
You will now be presented with the SIP Accounts window again, however it will now display the account you've configured. Ensure the Enabled checkbox is ticked and click the Close button. [view screen shot]
You will now be returned to the X-Lite Softphone, and the phone will now detect your network settings. [view screen shot]
After a few moments the Softphone display will change to Ready. [view screen shot]
You've now configured your ClicknCallnow VoIP Account on the X-Lite Softphone and are ready to make VoIP calls.
How to use X-Lite 3.0 Softphone
On the X-Lite Softphone main screen, enter the phone number you want to dial by clicking each of the corresponding numbers on-screen with your mouse or by pressing the corresponding keys on your keyboard.
If you make a mistake when dialling a number, the Clear button underneath the 0 can be used to correct your mistake. Once you've entered the correct number, click the Green phone located on the left-hand side of the X-Lite Softphone to dial the number.
The display will now alter to indicate you are dialling the number and you should now hear the relevant sounds in your headset/speakers. Once the call is established the display will alter to show the call duration.
Adjusting your speaker and microphone volume levels
During the call your microphone volume level (the slide bar next to red level indicator bar on the left of the dial pad) and your speaker level (the slide bar next to green bar on the right of the dial pad) can be increased or decreased by sliding the bar accordingly.
Ending/cancelling the call
To end or cancel a call click the Red phone button located on the right-hand side.