Grandstream Handytone 286 SIP configuration
Grandstream Handytone 286 is an ATA adaptor with a single ethernet interface and one POTS line enabling you to use a traditional phone as a SIP enabled IP device. This means that you will need an open ethernet port on your local network. It is fairly simple to setup and almost identical to the BudgeTone 100 configuration. The default configuration will get an IP address via DHCP.
STEP 1)
You must first determine the IP address of the device. There are two ways of doing this depending on the firmware version installed on the device. If option 1 does not work, try option 2.
Plug a POTS phone into the RJ11 connector, lift the handset and press the red button. Dial '02'. You will be told the IP address of your device (e.g. 192.168.0.100).
Plug a POTS phone into the RJ11 connector, lift the handset and press the * (asterisk) button 4-5 times until the menu says "IP ADDRESS". The current IP address will then be repeated back to you.
STEP 2)
Go to any browser equipped computer on your network and enter the address:
http://<IP ADDRESS>/
(where <IP ADDRESS> is replaced by the address that was given to you in STEP 1.
STEP 3)
You will be prompted to enter a password, the default is "admin", then click the "Login" button.
STEP 4)
You need to modify only a few parameters from the factory default.
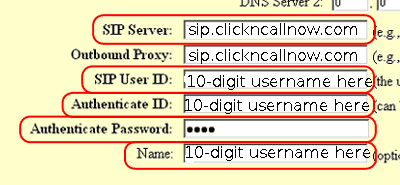
They are listed below and can be found on the "ADVANCED SETTINGS 1" and "ADVANCED SETTINGS 2" tabs at the top of the page.
SIP Server:sip.clickncallnow.com
SIP User ID: Enter the 10-digit username contained in your ClicknCall welcome email.
Authenticate ID: Enter the 10-digit username contained in your ClicknCall welcome email.
Authenticate Password: Enter the sip password contained in your ClicknCall welcome email.
Name:Enter the 10-digit username contained in your ClicknCall welcome email.

SIP Registration: Yes
NAT Traversal: No
Send DTMF: via RTP (RFC2833)
STEP 5)
Click on the "Update" button at the bottom of the form.
Grandstream HandyTone286 Configuration
STEP 6)
You will be brought to a confirmation screen on which you will click on the only option available: "Click to view your changes".
STEP 7)
Click on the "Reboot" button at the bottom of the form.
STEP 8)
Make calls!
